Posted by Jason Eatock - Aug. 02, 2020 | Contact Author![]()
3 Solutions to Solve Premiere Pro Cannot Open/Import HEVC/H.265 File
HEVC is getting increasingly popular and becomes the preferred codec to encode 4K recordings and Adobe Premiere Pro has extended the support for HEVC files with the release of Adobe Premiere Pro CC 2015.1 and added the support for QuickTime (MOV) wrapped HEVC files in Premiere Pro CC 2018 (12.0.1). However, many users are still stuck with issues like [b]file import failure[/b] or [b]the importer reported a generic error[b] when they try importing or opening the 4K/HD HEVC footage from iPhone, DJI Mavic 2 Pro, GoPro, Canon XF 705 camera or other devices in Premiere Pro. It seems that Adobe Premiere Pro still cannot be fully compatible with the HEVC videos. As a matter of fact, the reason varies and here we won't talk about the reasons in details. Here we will mainly introduce 3 solutions to help you solve HEVC and Premiere Pro incompatible issue. Keep reading for details.

3 Solutions to Solve HEVC Codec Not Working in Adobe Premiere Pro
Solution 1: Download and install HEVC codec for Adobe Premiere Pro
Note: Not everyone can install HEVC codec successfully. And the import error may still persist even if you have managed to install HEVC codec. What's more, installing new codec may cause new problems. It may lead to codec conflict and failure of reading some files.
Step 1. Open Adobe Premiere Pro and enter your license.
Step 2. Import your Mavic 2 Pro HEVC-encoded video into Adobe Premiere Pro, and then you may receive a prompt as shown in the picture. (Some users might not get this message.)

Step 3. Click OK to perform HEVC codec installing.
Step 4. Restart your computer and import your HEVC footage.
Solution 2: Upgrade your Adobe Premiere Pro 12.0.1 or later
As mentioned above, if you need to import HEVC files in MOV format, may be from your iPhone, into Adobe Premiere Pro, make sure you're using version 12.0.1 or later. Below are the steps to upgrade Premiere Pro to the latest version.
Step 1. Save your work and close your Adobe apps, or you will receive a warning to close.
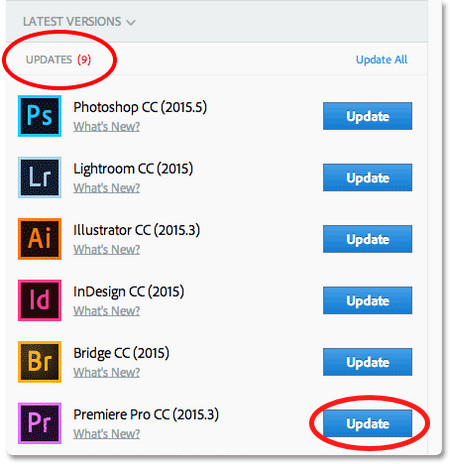
Step 2. Open Adobe Creative Cloud desktop app, click Apps tab, and then you will see those installed Adobe apps including Adobe Premiere Pro CC. When there're available update versions, you'll see Update buttons next to the apps.
Step 3. Click Update next to Adobe Premiere Pro CC. If you want to update all apps, you should click Update All.

Step 4. Set Advanced Options.
▪ Select or deselect Import previous settings and preferences. If this option is checked, settings and preferences of your previous version will be moved to the new version.
▪ Select or deselect Remove old versions. If this option is checked, your previous version will be removed.
Step 5. After finishing all settings, click Update to start upgrading Premiere Pro CC to the most recent version.
If you fail to update Adobe Premiere Pro CC, see if the solutions to troubleshoot Creative Cloud download and install issues can help you.
Note: The latest Adobe Premiere Pro was upgraded to version 14.1 in April 2020. After upgrading the Adobe Premiere Pro on your PC, if you are still stuck by codec issues, consider upgrading your hardware then. If you want perfect adaptation and performance, your PC build should be upgraded to the recommended specifications.
Solution 3: Transcode HEVC to Premiere Pro compatible codec (Highly Recommended)
In fact, HEVC is a non-performant format that is difficult to edit with and requires much computing power to process. Importing HEVC files into Premiere Pro is still a headache problem. Let's not to say some 10-bit HEVC videos shot in DLOG-M. If you are still unable to import HEVC-encoded files into Adobe Premiere Pro CC after installing the HEVC codec or upgrading, transcoding HEVC files becomes a highly recommended method, especially if your files are in 4K HEVC and you don't have a high-end computer.
To convert HEVC files for Premiere Pro, you can adopt DumboFab Video Converter for help. This program features high efficiency and seamless conversion. With it, you can transcode HEVC/H.265 MP4, HEVC MOV, 4K HEVC/H.265 to lossless MPEG-2, ProRes codec, which can be used in Premiere Pro CC, CS6, CS5 without any trouble.
Click-and-go HEVC Encoder and Decoder to Convert HEVC to Premiere Pro Highly Compatible Format
• Accept HEVC videos from GoPro, DJI, iPhone, Canon camera, etc.
• Output media in file formats natively supported by Adobe Premiere Pro, Final Cut Pro, Sony Vegas, Avid, etc.
• Simple edit: cut, crop, merge, rotate, flip videos; add effect, text/image watermark to videos, etc.
• 30X faster conversion speed than any conventional converters
3 simple steps to do the HEVC to Premiere Pro conversion
Step 1. Open DumboFab Video Converter, you can directly drag and drop source HEVC files, or click Add Video button on the toolbar to load HEVC files.

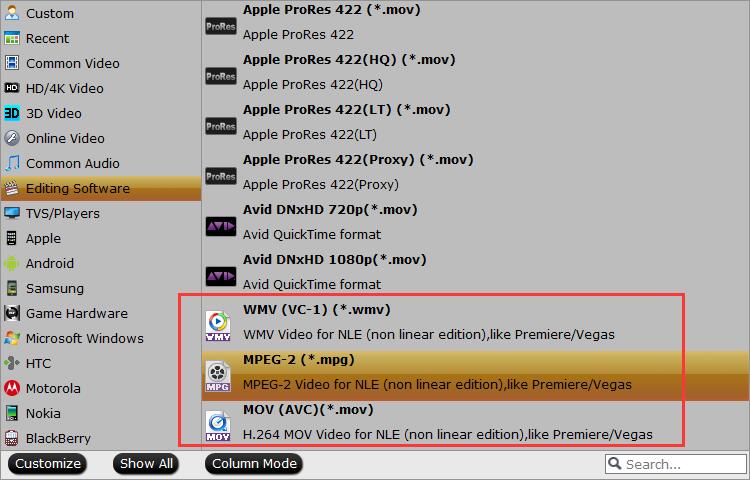
Step 2. Click Format pull down list to select MPEG-2(*.mpg) from Editing Software category as the best video format for Adobe Premiere Pro CC/CS6/CS5. Another two specialized formats WMC (VC-1) (*.wmv) and MOV (AVC) (*.mov) are the good choice as well.

Step 3. Hit Convert button in the lower right corner and the conversion will begin in no time. Once done, Adobe Premiere Pro should be able to import the converted HEVC footage without any trouble.

