Posted by Jason Eatock - July 25, 2023 | Contact Author![]()
How to Export Adobe Premiere Pro Projects to MP4
Adobe Premiere Pro is one of the most popular industry standard video editing software in the world. Once you finished your project in Premiere Pro, you may want to upload it on YouTube, Vimeo, or any other platform to show it to the world. Now it comes to the final thing - select a format to export. Among all digital formats, MP4 is the format compatible with almost all platforms. Then how to use Premiere Pro export MP4 videos effortlessly? If you're dazzled by so many options and terminologies Premiere Pro shows you, you've come to the right place. Here is the step-by-step guide to save Premiere Pro projects as an MP4 file.
Part 1. How Adobe Premiere Pro Export Videos to MP4 for Various Platforms
Why choose MP4 as the best export format from Premiere Pro?
The best format for exporting Premiere Pro video to largely depends on what you want to do with the file. Although there are some exceptions, mp4 is the best format to export a video from Premiere Pro. It has so far the optimal compatibility with media players, mobiles, TVs, PCs, tablets and gaming systems. So whether you want to play the video on your computer, or share it to YouTube, Instagram, and WhatsApp, you can export Premiere Pro project to MP4 first.
In addition to its compatibility, mp4 files compress the video data just enough to make it easily playable without hurting quality. That means your viewers will be able to watch your stunning video regardless of how strong or fast their internet signal may be.
If you're very familiar with Premiere Pro, then you can follow the basic steps below to export Premiere Pro to MP4:
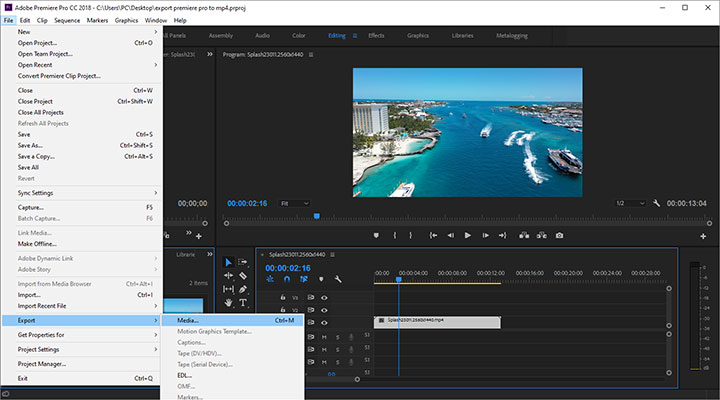
- 1. Go to File > Export > Media from the top menu bar to open export settings panel.
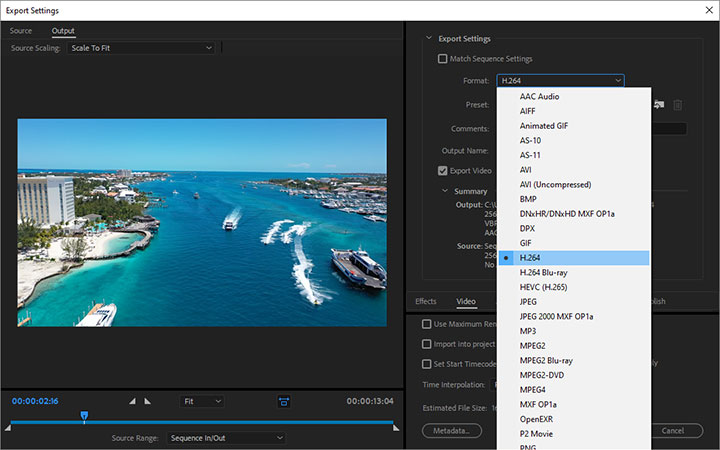
- 2. Select H.264 from the drop-down list of Format.
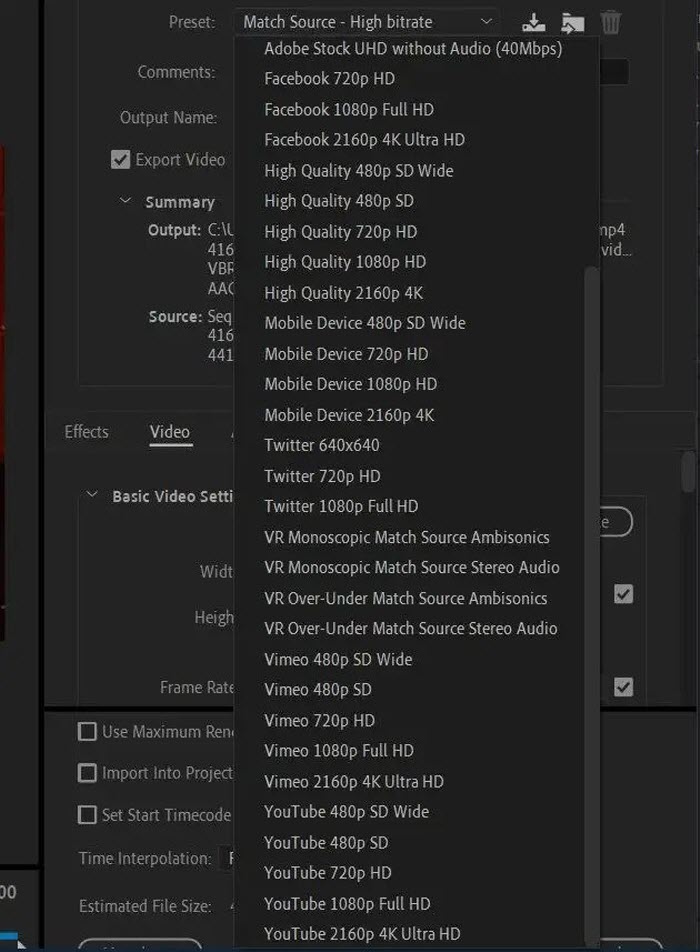
- 3. Choose a Preset for your MP4 video under Preset option.
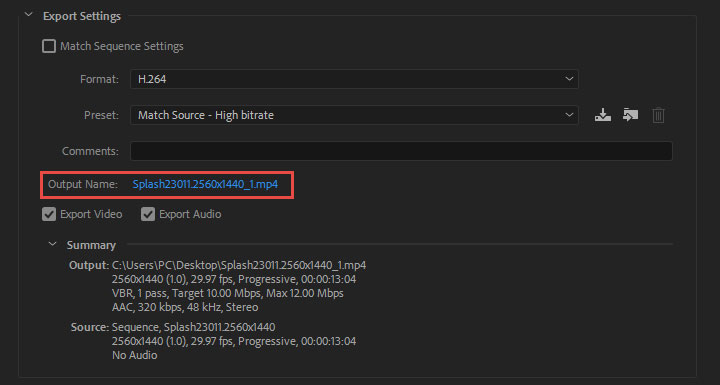
- 4. Set the file name and the save path by clicking the Output Name.
- 5. Click Export to start saving Premiere Pro as MP4.
If you're a novice user or not familiar with this video editing software, then you can follow the step-by-step guide with detailed explanation below. Before exporting Premiere Pro to MP4, make sure you've saved your project to avoid any errors occur during the export process.
Step 1. Open Export Settings Panel
Click on the File in the top menu bar, select the Export option, and choose Media from the list. Or you can press Ctrl+M (Windows) or Command+M (macOS) to open the Export Settings Panel.
Tips: You can select the desired sequence by click the Timeline panel. To export only a single clip from the sequence, use the Mark In and Mark Out buttons to set In and Out points.
Step 2. Select MP4 as Output Format
Click and expand the Format menu and choose H.264 from the drop-down list. Please make sure you select H.264 and not MPEG4 to export as an MP4.
Step 3. Choose the Best Preset for your MP4 video
Generally, H.264 format will export your video with good quality. Chances are you may want to upload the video to YouTube or upscale the MP4 with better quality for your 4K TV or so. Here are better recommendations to export your video file from the Preset list.
Premiere Pro offers many presets available, from Facebook 720p HD, High Quality 2160p 4K, mobile device 720p HD, Vimeo 480p SD, to YouTube presets ranging from 480p SD to 1080p Full HD and 4K Ultra HD. If you want to share your video to various platforms, you can export your project in various formats corresponding to the platforms.
Generally, higher bitrate gives result to better quality. But bear in mind that high quality preset also leads to enlarged file size and slow rendering time.
Step 4. Set the File Name and the Save Path
Click the blue underlined filename to bring up the Save As dialog box. Use this to name your video and specify the export location.
Step 5. Start the export process
Click the Export button at the bottom of the window to export as MP4. You can also click Queue to add your project to the render queue of Adobe Media Encoder.

Part 2. Alternative Way to Export Premiere Pro as MP4 by Converting
For some unknown reasons, the MP4 videos exported from Premiere Pro may not be recognized by some social media sites, device or other platforms. Or Premiere Pro may crash during the export process and you'll need to export your video as an intermediary file format. In such cases, you may have to convert the Premiere Pro clip to a readable MP4 format with a reliable software tool like DumboFab Video Converter.
Equiped with 400+ video and audio codecs, it's capable of converting any video to MP4, MOV, MKV, WMV, HEVC, and more without quality loss at ultra-fast encoding speed. Besides that, this software also offers more features, like compressing, trimming, cropping, merging, adding subtitles. And it's very easy to use and the conversion tasks can be done without too much of learning curve like Premiere Pro does.
If you encounter codec or format (e.g. MKV, HEVC, AV1, etc.) incompatibility issue in Premiere Pro, you can also use it to convert the incompatible video to Premiere Pro natively supported format and codec without quality loss.
Now download and install this program on your PC or Mac. After that, you can follow the simple steps below to convert Premiere Pro projects to MP4.
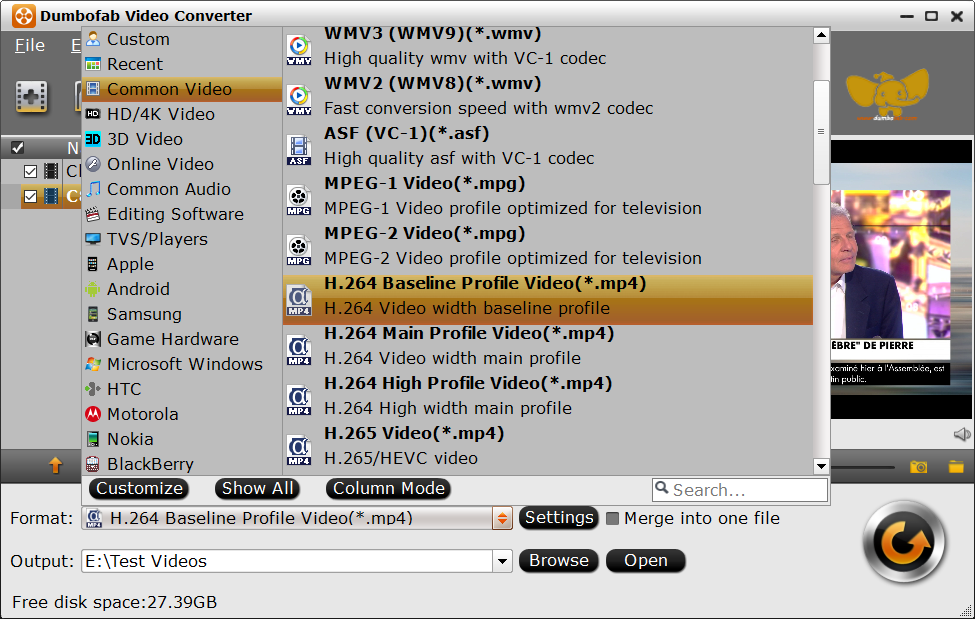
Step 1. Launch DumboFab Video Converter and then click Add Video button to import the Adobe premiere Pro video you want to convert.
Step 2. Click "Format" bar and move mouse cursor to Common Video category, then select an H.264 MP4 profile as the output format. If you need to convert the projects to MP4 for iPhone, Android device, YouTube or other web services, you can also find a readymade profile.
Optionally, you can change video resolution, codec, frame rate, and more as per your needs. And even shorten the video duration, remove black bars from the video, etc.
Step 3. Finally, hit the big Convert button to begin converting and exporting Premiere Pro video to MP4 format.
Part 3. FAQs about Premiere Pro Exporting
1. What's best export format and settings for Premiere Pro?
In general, MP4 is widely considered the best overall video format because it's compatible with just about every device and online platform.
And depending on compatibility, file size and quality, the table below shows the best MP4 export settings in Premiere Pro.
Best Export Settings for Premiere Pro |
|
Format |
H.264 |
Preset |
Match Source - High Bitrate |
Basic Video Settings (Resolution & Frame Rate) |
Match Source |
Render at Maximum Depth |
✓ |
Profile |
High |
Level |
4.2 |
Bitrate Encoding |
VBR, 2 pass |
Audio Codec |
AAC |
Sample Rate |
48000 Hz |
Channels |
Stereo |
Audio Quality |
High |
Bitrate [kbps] |
320 |
Use Maximum Render Quality |
✓ |
2. How to export Premiere Pro for YouTube?
Below are the steps to use the best export settings for YouTube in Premiere Pro:
- 1. Go to File > Export > Media to bring up the Export Settings panel.
- 2. Select H.264 as the format from the Format drop-down list.
- 3. Click Preset menu and choose YouTube 1080p Full HD.
- 4. Set the Bitrate encoding to VBR, 2 pass.
- 5. Choose AAC for Audio Format Settings.
- 6. Check the Maximum Render Quality box.
- 7. Click Export to export Premiere Pro for YouTube.
3. Is it possible to export Premiere Pro to MP4 without quality loss?
In theory, it's not possible. Premiere Pro is not different from a muxing app. It exports a completely different file out and re-encode to a new file. However, visually, you can choose the H.264 and export as 1920x1080 in Premiere Pro, this will export MP4 with quality loss imperceptibly.

