Posted by Chris Ellison - Aug 2, 2021 | Contact Author![]()
How to Rip DVDs for Jellyfin and Add DVDs to Jellyfin
Jellyfin is a free, open-source media server software solution. With installers for Linux, Windows, macOS, and Docker containers, Jellyfin is cross-platform compatible. Not only is Jellyfin itself free to download and install, but all of its client apps for streaming to Android, iOS, Roku, and Apple TV are completely free, no purchase necessary. Just like Plex and Emby, it's also capable of storing users' movies, videos, TV shows, songs, photos, and more on a central server and then allows users to access media content on all devices they love to watch anytime and anywhere. Therefore, many people want to add DVDs to Jellyfin. But to do this, first of all we need to rip DVDs for Jellyfin.
"I have loads of DVDs, and as usual I would like to play these DVD discs on my DVD player. But recently I have been using Jellyfin a lot for streaming movies. The problem is that Jellyfin doesn't directly stream DVD movies. What should I do? How can I stream DVD discs via Jellyfin Media Server? Do you have any solution for streaming DVD disc via Jellyfin?"
In this article, we will cover everything you want to know about DVD to Jellyfin, including what's best software for ripping DVD to Jellyfin, what is the optimum format for ripping DVDs for Jellyfin, and how to fast copy and get DVD to Jellyfin with best quality in a smaller file size.
Table of contents:
Part 1. What Is the Best Software for Ripping DVD to Jellyfin?
MakeMKV, Handbrake, and DumboFab DVD Ripper, which one to choose?
MakeMKV just extracts the video and audio from DVD, that explains why it is fast and why the output file is very large.
Handbrake also outputs a large file about 6GB when ripping a feature-length DVD movie to MP4 based on the test. Worse still, it runs sluggish and often crashes in the middle of process. Plus, the commercial DVDs aren't in their domain which they can handle with.
DumboFab DVD Ripper covers the best format for Jellyfin and can fast convert DVD to Jellyfin format with best quality in a smaller file size. Now, let's check more details about DumboFab DVD Ripper.
▶ It can convert DVD to MP4 (best format for Jellyfin), MOV, MPEG, WMV, MKV, and more mainstreaming formats.
▶ Jellyfin doesn't support ISO image and VIDEO_TS folder. Never mind. DumboFab DVD Ripper can convert ISO and VIDEO_TS to Jellyfin compatible format.
▶ It also supports 1:1 clone DVD to VIDEO_TS folder.
▶ It can handle both home-made and copy-protected DVDs. No need to install 3rd-party software.
▶ It rips DVDs at ultrafast speed thanks to the support for Intel/NVIDIA hardware acceleration, multi-core CPU, and Hyper-threading tech.
▶ It allows adjusting output video/audio parameters, including change resolution, codec, bit rate, frame rate, aspect ratio, etc.
▶ It comes with some video editing features: trim, crop, merge, deinterlace, add external subtitle...
All in all, DumboFab DVD Ripper is the best DVD ripper for Jellyfin.
※ For macOS 10.14 or lower, you're recommended to download 32-bit installer here.
Part 2. What Is the Best Format for Ripping DVDs to Jellyfin Media Server
Before getting into the guide of ripping DVDs for Jellyfin, let's first make clear which formats Jellyfin Media Server can accept. Jellyfin's media compatibility and video quality limitations vary by device. The typically native supported codec of Jellyfin is MP4 (H.264+AAC).
Videos satisfying the following standards can usually be directly played with Jellyfin:
● Container: MP4
● Video Encoding: H.264 (level 4.0 or lower)
● Audio Encoding: AAC
● Resolution: 1920×1080 or smaller
● Video Framerate: 30fps
● Video Bit Depth: 8
Part 3. How to Rip DVD to Jellyfin with DumboFab DVD Ripper in Simple Clicks
To begin with, free download and install DumboFab DVD Ripper on your PC or Mac, then follow the step-by-step instruction below:
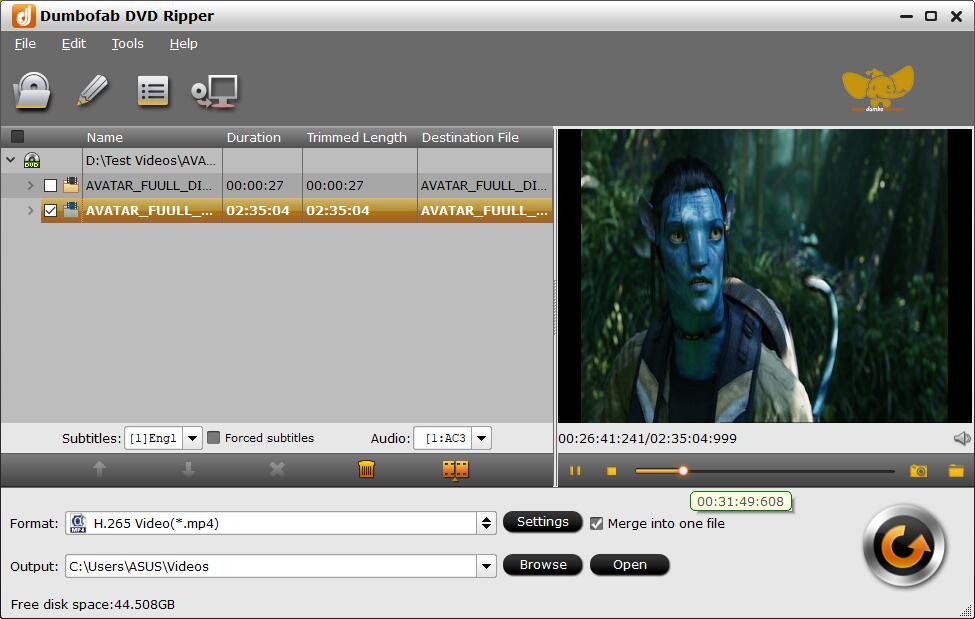
Step 1. Load the DVD you want to import to Jellyfin.
Run the software and insert the DVD into the disc drive. Then click the "Load DVD" button and the ripper will start to scan the right DVD title and load the whole DVD content.

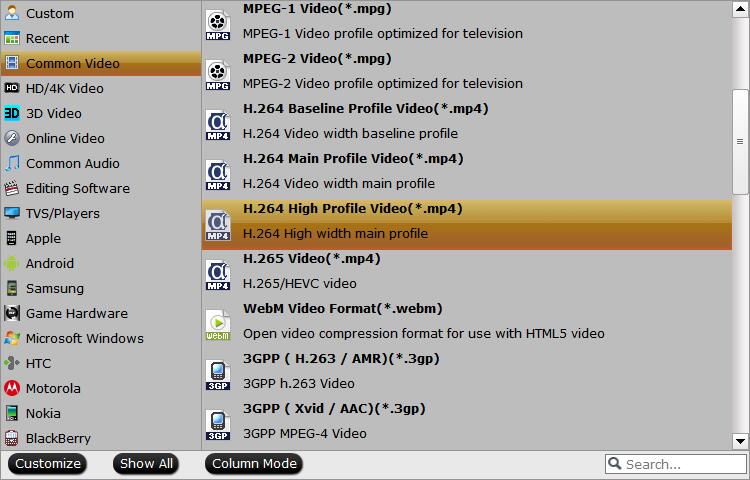
Step 2. Choose an output format that Jellyfin supports.
Click "Format" drop-down list, and move mouse cursor to "Common Video" category and select H.264 Baseline Profile Video(*.mp4) as the output format. Optionally you can choose preferred audio track, subtitle, and output folder.
Click the Settings icon, you can adjust video audio parameters. But if you don't know parameters very well, just keep the default settings which are the optimal settings for your Jellyfin.

Step 3. Get DVD ripping started.
Hit the "Convert" button to rip DVD for Jellyfin at lightning speed with best quality.
Part 4. How to Add DVD Movies to Jellyfin
Follow the below steps to install Jellyfin Media Server and add the ripped DVD movies to Jellyfin.
1. Download the latest Jellyfin server from the official website.
2. Extract the archive and run Jellyfin.exe
3. A command prompt window should open and install the required services. Keep this window open, it is the server app.
4. The program opens a new browser tab, and displays the Jellyfin quick start guide.
5. Follow the on-screen instructions to setup your local server's account name and password.
6. Next, you'll be asked to add your media library. Select the folders on your computer (or a USB external HDD) which has the ripped DVD movies or TV shows, that you want to stream.
7. You will see some extra settings while selecting the folder, but apart from selecting the language and region, most of these settings are optional.

Now, with the Jellyfin Media Server installed on your computer and the ripped DVD movies added to Jellyfin Media Server, you then only need to connect your device to Jellyfin Media Server on your computer:
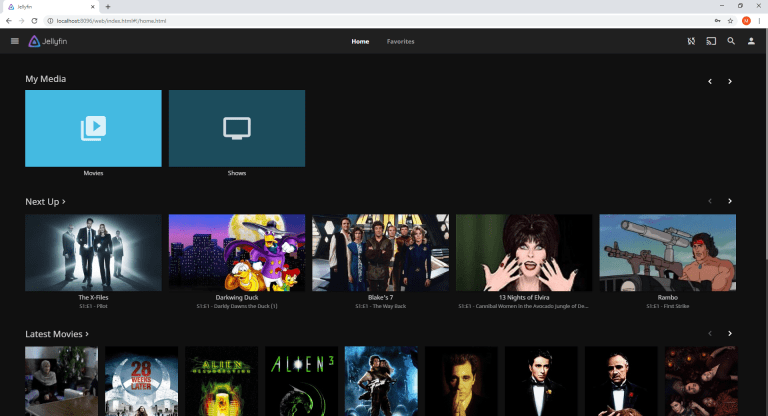
1. Once you have set up the media library, you'll be taken to the server's homepage. (refer to the first screenshot).
2. Click the menu icon on the left and select the "Dashboard" option. (Admin section).
3. Here you will see your server's name, version number (of Jellyfin), port number (8096) and 2 URLs; LAN Address and WAN address.
4. Download the Jellyfin client app on the device that you want to use for streaming: Android phone (Google Playstore) or Android TV (Amazon FireStick, Google Chromecast) or Kodi.
5. Open the client app and you'll be prompted to enter the URL of the server to connect to. Refer to step 3 to get the URL. Type it without adding the port number at the end.
6. Enter the password you set while configuring the server to authenticate your connection.

